1.1.5. ROS 2 - WebSocket bridge
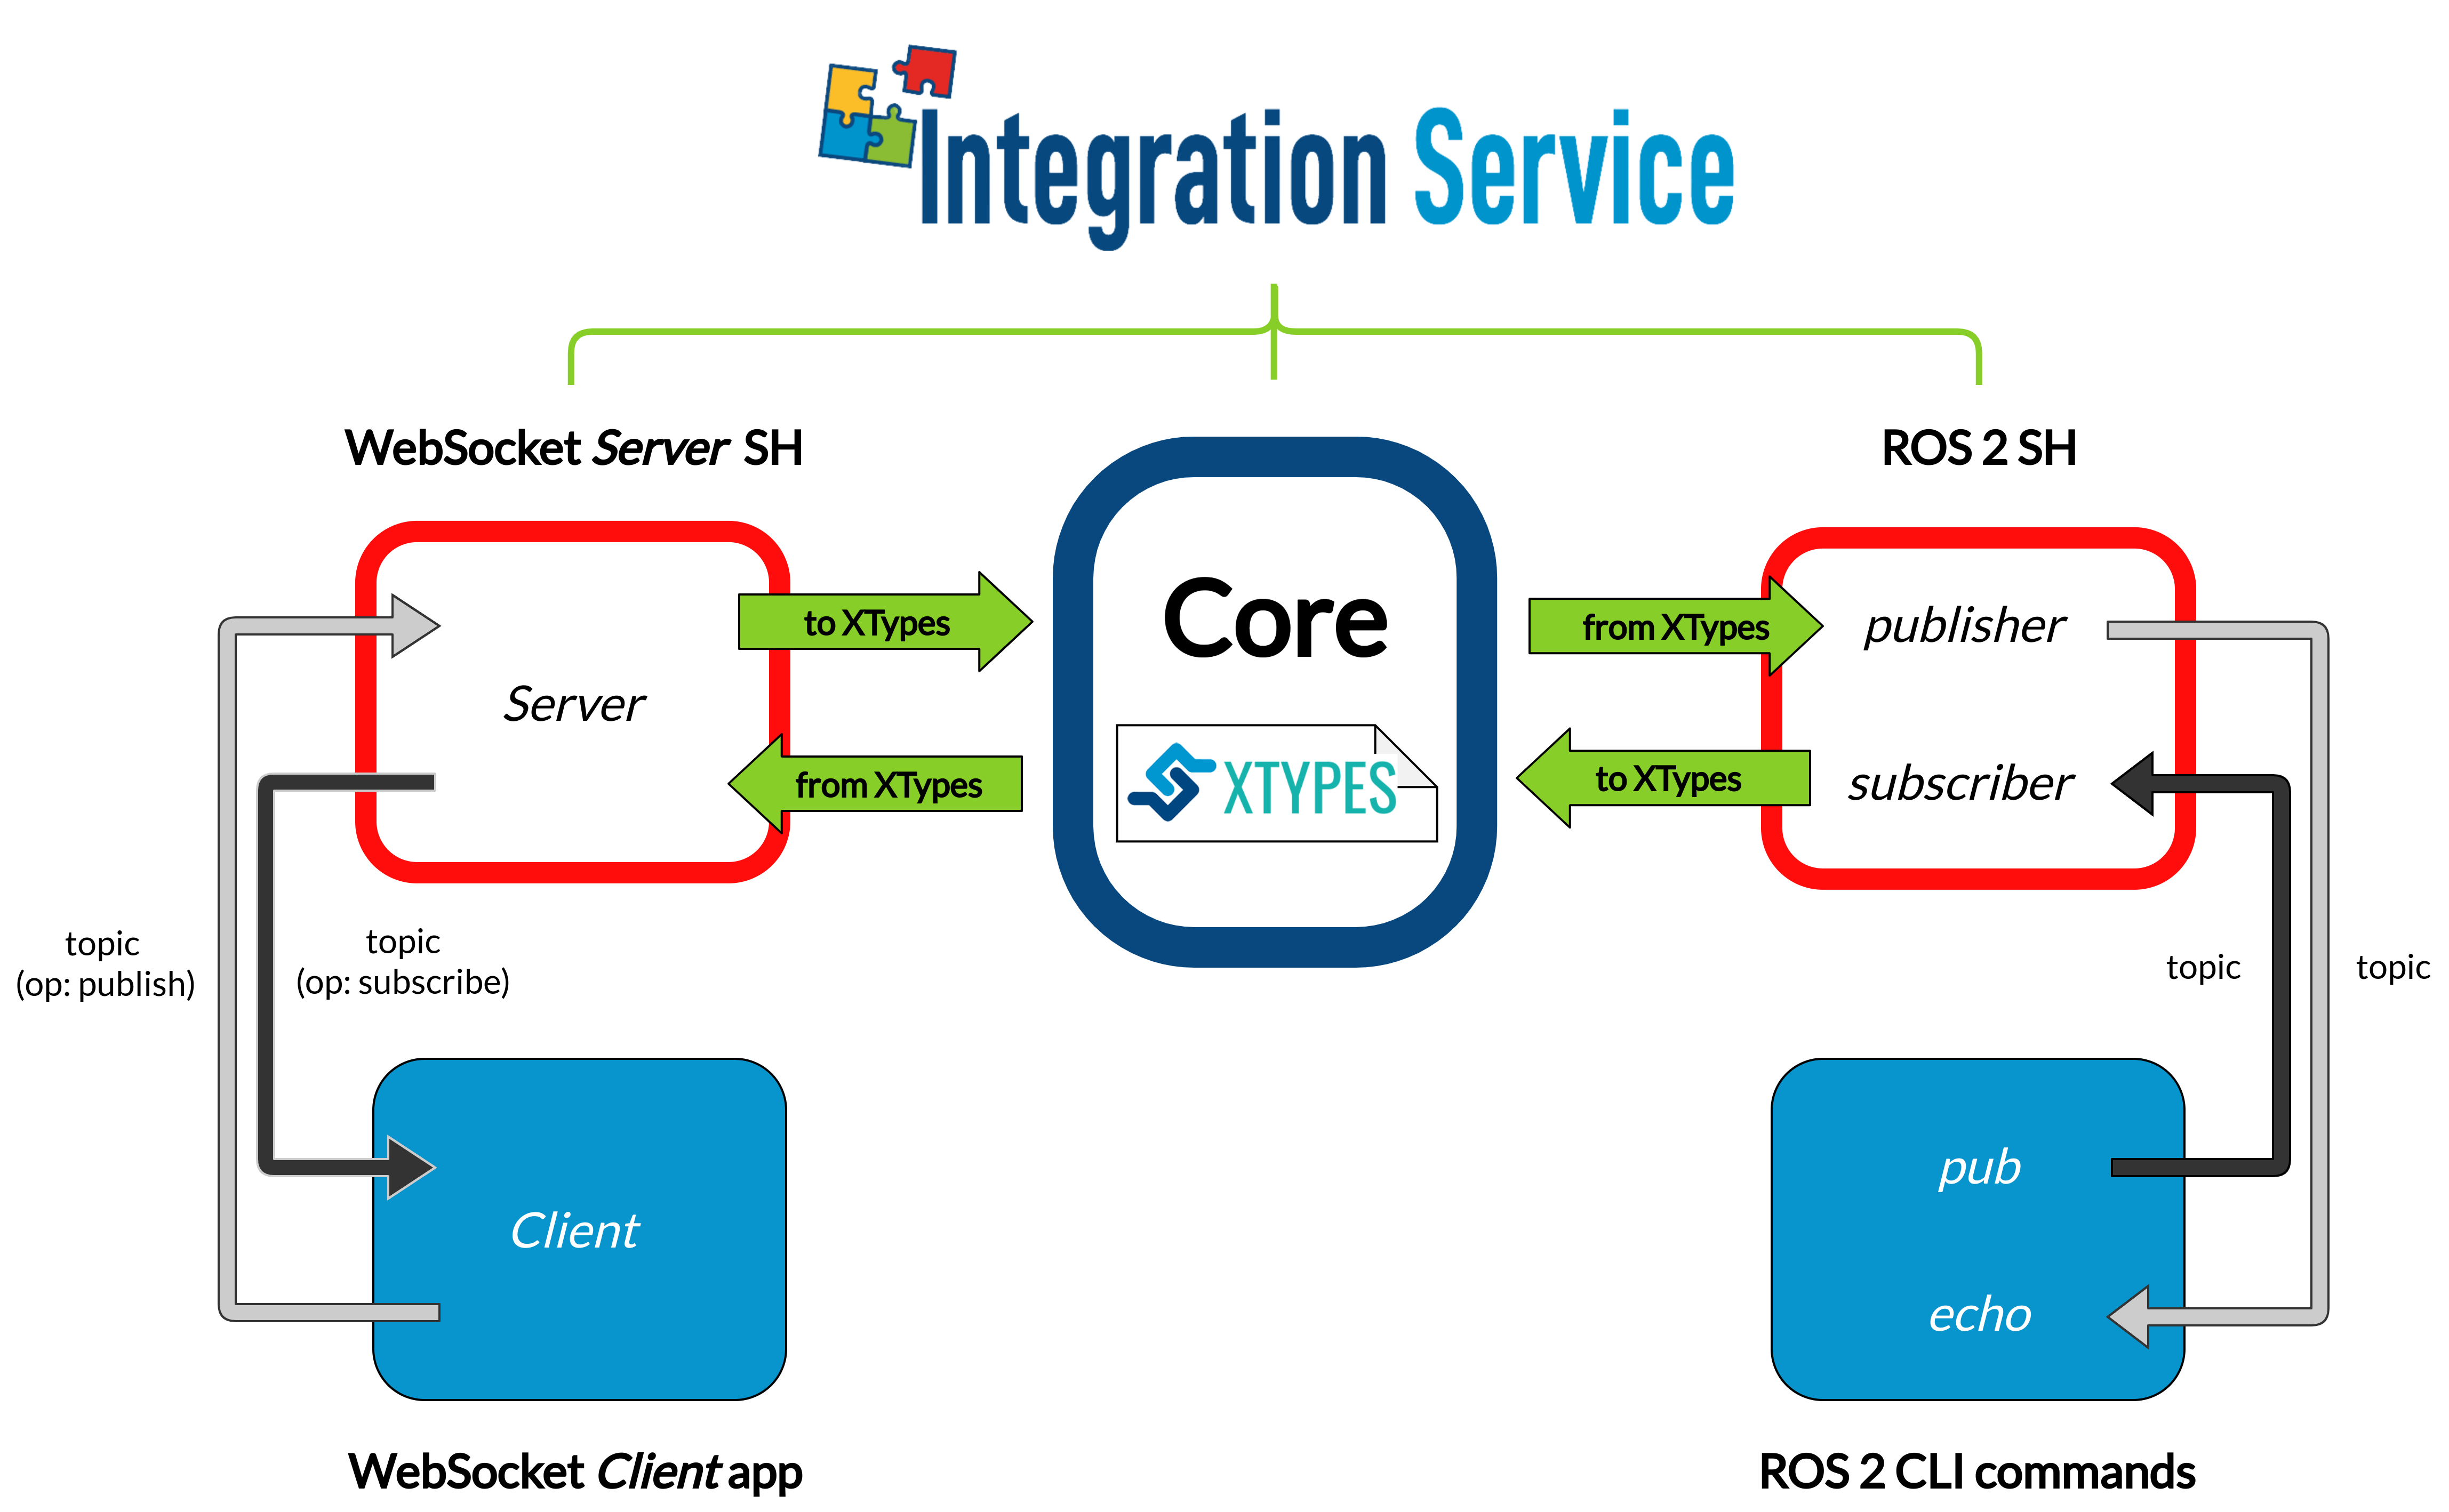
Another relevant use-case for Integration Service is that of connecting a WebSocket and a ROS 2 application
The examples detailed below addresses the situation of a ROS 2 talker-listener example
communicating with a WebSocket client.
1.1.5.1. Requirements
To prepare the deployment and setup the environment, you need to have Integration Service correctly installed in your system. To do so, please follow the steps delineated in the Installation section.
Also, to get this example working, the following requirements must be met:
Having ROS 2 (Foxy or superior) installed, with the
talker-listenerexample working.Having the ROS 2 System Handle installed. You can download it from the ROS2-SH dedicated repository into the
is-workspacewhere you have Integration Service installed:
cd ~/is-workspace
git clone https://github.com/eProsima/ROS2-SH.git src/ROS2-SH
Having OpenSSL and WebSocket++ installed:
apt install libssl-dev libwebsocketpp-dev
Having the WebSocket System Handle installed. You can download it from the WebSocket-SH dedicated repository into the
is-workspacewhere you have Integration Service installed:
cd ~/is-workspace
git clone https://github.com/eProsima/WebSocket-SH.git src/WebSocket-SH
After you have everything correctly installed in your is-workspace, build the packages by running:
colcon build
1.1.5.2. Deployment
Below we explain how to deploy an example of this communication in both directions allowed.
ROS 2 pub to WebSocket client
To enable communication from ROS 2 to a WebSocket client, open two terminals:
In the first terminal, source your ROS 2 installation and execute a ROS 2
pub:
source /opt/ros/$<ROS2_DISTRO>/setup.bash
ros2 topic pub /hello_websocket std_msgs/msg/String “{data: Hello WebSocket}”
In the second terminal, go to the
is-workspacefolder, source the ROS 2 and local installations, and execute Integration Service with theintegration-servicecommand followed by the ros2_websocket__helloworld.yaml configuration file located in thesrc/Integration-Service/basicfolder:
cd ~/is-workspace
source /opt/ros/$<ROS2_DISTRO>/setup.bash
source install/setup.bash
integration-service src/Integration-Service/examples/basic/ros2_websocket__helloworld.yaml
Up to this point, the Integration Service should have created a WebSocket server application within the WebSocket System Handle, to listen and handle petitions coming from a WebSocket client.
In order to test the intercommunication between a ROS 2 publisher and a demo WebSocket client subscriber application
click here.
The hyperlink leads to a webpage that creates a WebSocket connection to
ws://localhost:80 where the Integration-Service* has created the
WebSocket Server according with the yaml file.
The WebSocket System Handle uses this handshake protocol. Basically once the connection is established the server will send messages to advertise which topics and types are available:
{"op": "advertise", "topic": "hello_websocket”, "type": "std_msgs/String"}
The webpage answers by requesting a subscription to the advertised topic:
{"op": "subscriber", "topic": "hello_websocket", "msg": {"data": "Hello WebSocket"}}
The server will proceed to relay all messages available on the requested topic in the format:
{"msg":{"data":"Hello WebSocket"},"op":"publish","topic":"hello_websocket"}
The webpage will add a new line for each ROS2 message received.
WebSocket client to ROS 2 echo
To enable communication from a WebSocket client to ROS 2, open two terminals:
In the first terminal, source your ROS 2 installation and execute a ROS 2
echo:
source /opt/ros/$<ROS2_DISTRO>/setup.bash
ros2 topic echo /hello_ros2 std_msgs/msg/String
In the second terminal, go to the
is-workspacefolder, source the ROS 2 and local installations, and execute Integration Service with theintegration-servicecommand followed by the ros2_websocket__helloworld.yaml configuration file located in thesrc/Integration-Service/basicfolder:
cd ~/is-workspace
source /opt/ros/$<ROS2_DISTRO>/setup.bash
source install/setup.bash
integration-service src/Integration-Service/examples/basic/ros2_websocket__helloworld.yaml
Up to this point, the Integration Service should have created a WebSocket server application within the WebSocket System Handle, to listen and handle petitions coming from a WebSocket client.
In order to test the intercommunication between WebSocket client publisher
application and a ROS 2 subscriber click here.
The hyperlink leads to a webpage that creates a WebSocket connection to
ws://localhost:80 where the Integration-Service* has created the
WebSocket Server according with the yaml file.
The WebSocket System Handle uses this handshake protocol. Basically once the connection is established the client must advertise the new topic available by sending the following message to the server:
{"op": "advertise", "topic": "hello_ros2”, "type": "std_msgs/String"}
After this, we can send individual messages from the WebSocket client, using the publish operation:
{"op": "publish", "topic": "hello_ros2", "msg": {"data": "Hello ROS 2"}}
The messages should be shown in the ROS 2 echo terminal.