1.2.1. DDS Service Server
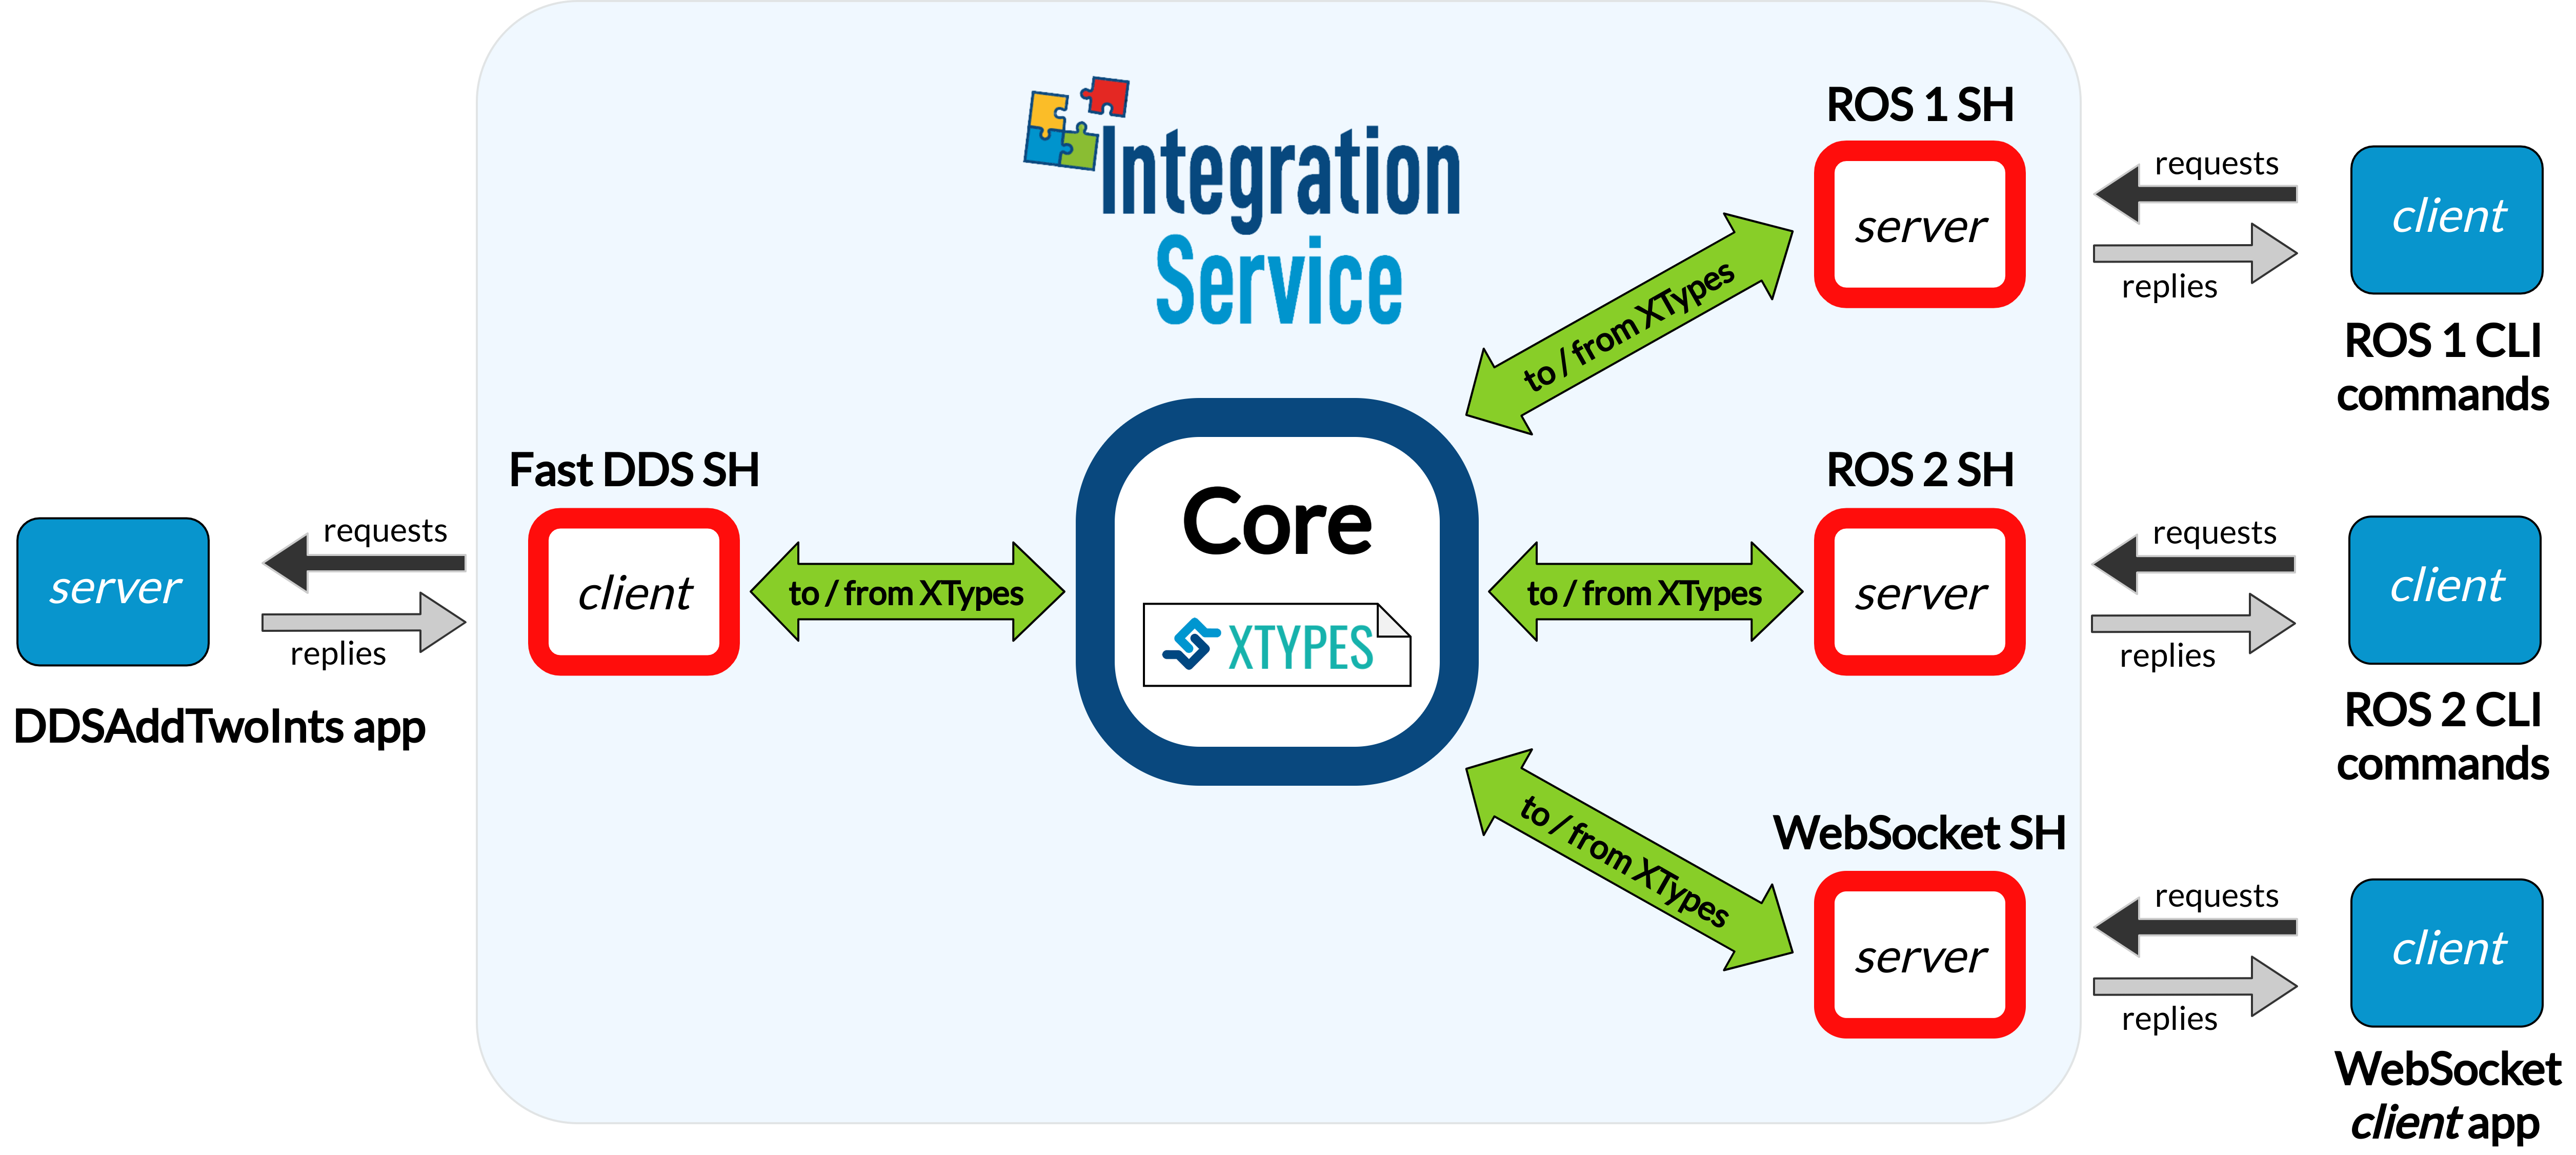
This example tackles the task of bridging a DDS server with one or more client applications, implemented using a wide variety of protocols.
Specifically, we discuss how to forward petitions coming from ROS 1, ROS 2 and a WebSocket
service client applications to a Fast DDS DDSAddTwoInts server application,
so that it can process them and fulfill each request with a proper answer message.
Note
If you are looking for an example on how to perform a service request from a DDS client to another protocol, please refer to any of the remaining examples in the server/client examples section.
1.2.1.1. Requirements
To prepare the deployment and setup the environment, you need to have Integration Service correctly installed in your system. To do so, please follow the steps delineated in the Installation section.
Also, to get this example working, the following requirements must be met:
Having Fast DDS (v.2.0.0 or superior) installed and the Integration Service
DDSAddTwoIntsexample working. This example can be found in the main Integration Service repository, under the examples/utils/dds/DDSAddTwoInts folder; to compile it, you can either compile the whole Integration Service project usingcolconwith the CMake flagBUILD_EXAMPLESenabled; or execute the following steps:cd ~/is-workspace/src/Integration-Service/examples/utils/dds/DDSAddTwoInts mkdir build && cd build cmake .. -DBUILD_EXAMPLES=ON && make
Having the Fast DDS System Handle installed. You can download it from the FastDDS-SH dedicated repository into the
is-workspacewhere you have Integration Service installed:cd ~/is-workspace git clone https://github.com/eProsima/FastDDS-SH.git src/FastDDS-SHHaving ROS 1 (Melodic or superior) installed and the Integration Service
example_interfacesROS 1 package compiled. This package can be found in the main Integration Service repository, under the examples/utils/ros1/src/example_interfaces folder. To compile and install it:source /opt/ros/$<ROS1_DISTRO>/setup.bash cd ~/is-workspace/src/Integration-Service/example/utils/ros1/catkin_ws catkin_make -DBUILD_EXAMPLES=ON -DCMAKE_INSTALL_PREFIX=/opt/ros/$<ROS1_DISTRO> install
Having the ROS 1 System Handle installed. You can download it from the ROS1-SH dedicated repository into the
is-workspacewhere you have Integration Service installed:cd ~/is-workspace git clone https://github.com/eProsima/ROS1-SH.git src/ROS1-SHHaving ROS 2 (Foxy or superior) installed, along with the
example_interfacestypes package. To install it:apt install ros-$<ROS2_DISTRO>-example-interfaces
Having the ROS 2 System Handle installed. You can download it from the ROS2-SH dedicated repository into the
is-workspacewhere you have Integration Service installed:cd ~/is-workspace git clone https://github.com/eProsima/ROS2-SH.git src/ROS2-SH src/ros2-shHaving OpenSSL and WebSocket++ installed:
apt install libssl-dev libwebsocketpp-dev
Having the WebSocket System Handle installed. You can download it from the WebSocket-SH dedicated repository into the
is-workspacewhere you have Integration Service installed:cd ~/is-workspace git clone https://github.com/eProsima/WebSocket-SH.git src/WebSocket-SH
After you have everything correctly installed in your is-workspace, build the packages by running:
source /opt/ros/$<ROS2_DISTRO>/setup.bash
colcon build --packages-skip-regex is-ros1 -DMIX_ROS_PACKAGES="example_interfaces"
source /opt/ros/$<ROS1_DISTRO>/setup.bash
colcon build --cmake-args -DBUILD_EXAMPLES=ON -DMIX_ROS_PACKAGES="example_interfaces"
1.2.1.2. Deployment
Below we explain how to deploy a full example of this communication, calling the DDS service from each of the available clients.
Launch the DDS AddTwoInts server
To do so, open a terminal, go to the is-workspace folder and execute the following command:
cd ~/is-workspace
./build/is-examples/dds/DDSAddTwoInts/DDSAddTwoInts -m server
The server will start running under the default DDS domain ID 0 listening for incoming petitions.
Execute Integration Service
Open two terminals:
In the first terminal, source the ROS 1 installation and run the
roscore:source /opt/ros/$<ROS1_DISTRO>/setup.bash roscoreIn the second terminal, go to the
is-workspacefolder, source the ROS 1, ROS 2 and local installations, and execute Integration Service with theintegration-servicecommand followed by the fastdds_server__addtwoints.yaml configuration file located in thesrc/Integration-Service/examples/basicfolder.source /opt/ros/$<ROS1_DISTRO>/setup.bash source /opt/ros/$<ROS2_DISTRO>/setup.bash source install/setup.bash integration-service src/Integration-Service/examples/basic/fastdds_server__addtwoints.yaml
Call the service from ROS 1
In a new terminal, source your ROS 1 installation and invoke the service by executing the following instructions:
source /opt/ros/$<ROS1_DISTRO>/setup.bash
rosservice call /add_two_ints 3 4
You should receive the following output from the DDS server processing the petition:
sum: 7
Call the service from ROS 2
In a new terminal, source your ROS 2 installation and invoke the service by executing the following instruction:
source /opt/ros/$<ROS2_DISTRO>/setup.bash
ros2 service call /add_two_ints example_interfaces/srv/AddTwoInts "{a: 5, b: 17}"
You should receive the following output from the DDS server processing the petition:
waiting for service to become available...
requester: making request: example_interfaces.srv.AddTwoInts_Request(a=5, b=17)

response:
example_interfaces.srv.AddTwoInts_Response(sum=22)
Call the service from WebSocket
In order to call the server from a WebSocket client click here.
The hyperlink leads to a webpage that creates a WebSocket connection to
ws://localhost:80 where the Integration-Service has created the
WebSocket Server according with the yaml file.
The WebSocket System Handle uses this handshake protocol. Basically once the connection is established the client will send a message to advertise the service it wants to use. The message syntax is like:
{"op": "advertise_service", "service": "add_two_ints", "request_type": "AddTwoInts_Request", "reply_type": "AddTwoInts_Response"}
Once the service has been advertised, the request is sent using a message format like:
{"op": "call_service", "service": "add_two_ints", "args": {"a": 14, "b": 25}}
Once the server has met the request it sends back the answer formatted as:
{"op":"service_response","result":true,"service":"add_two_ints","values":{"sum":39}}