1.1.2. FIWARE - ROS 2 bridge
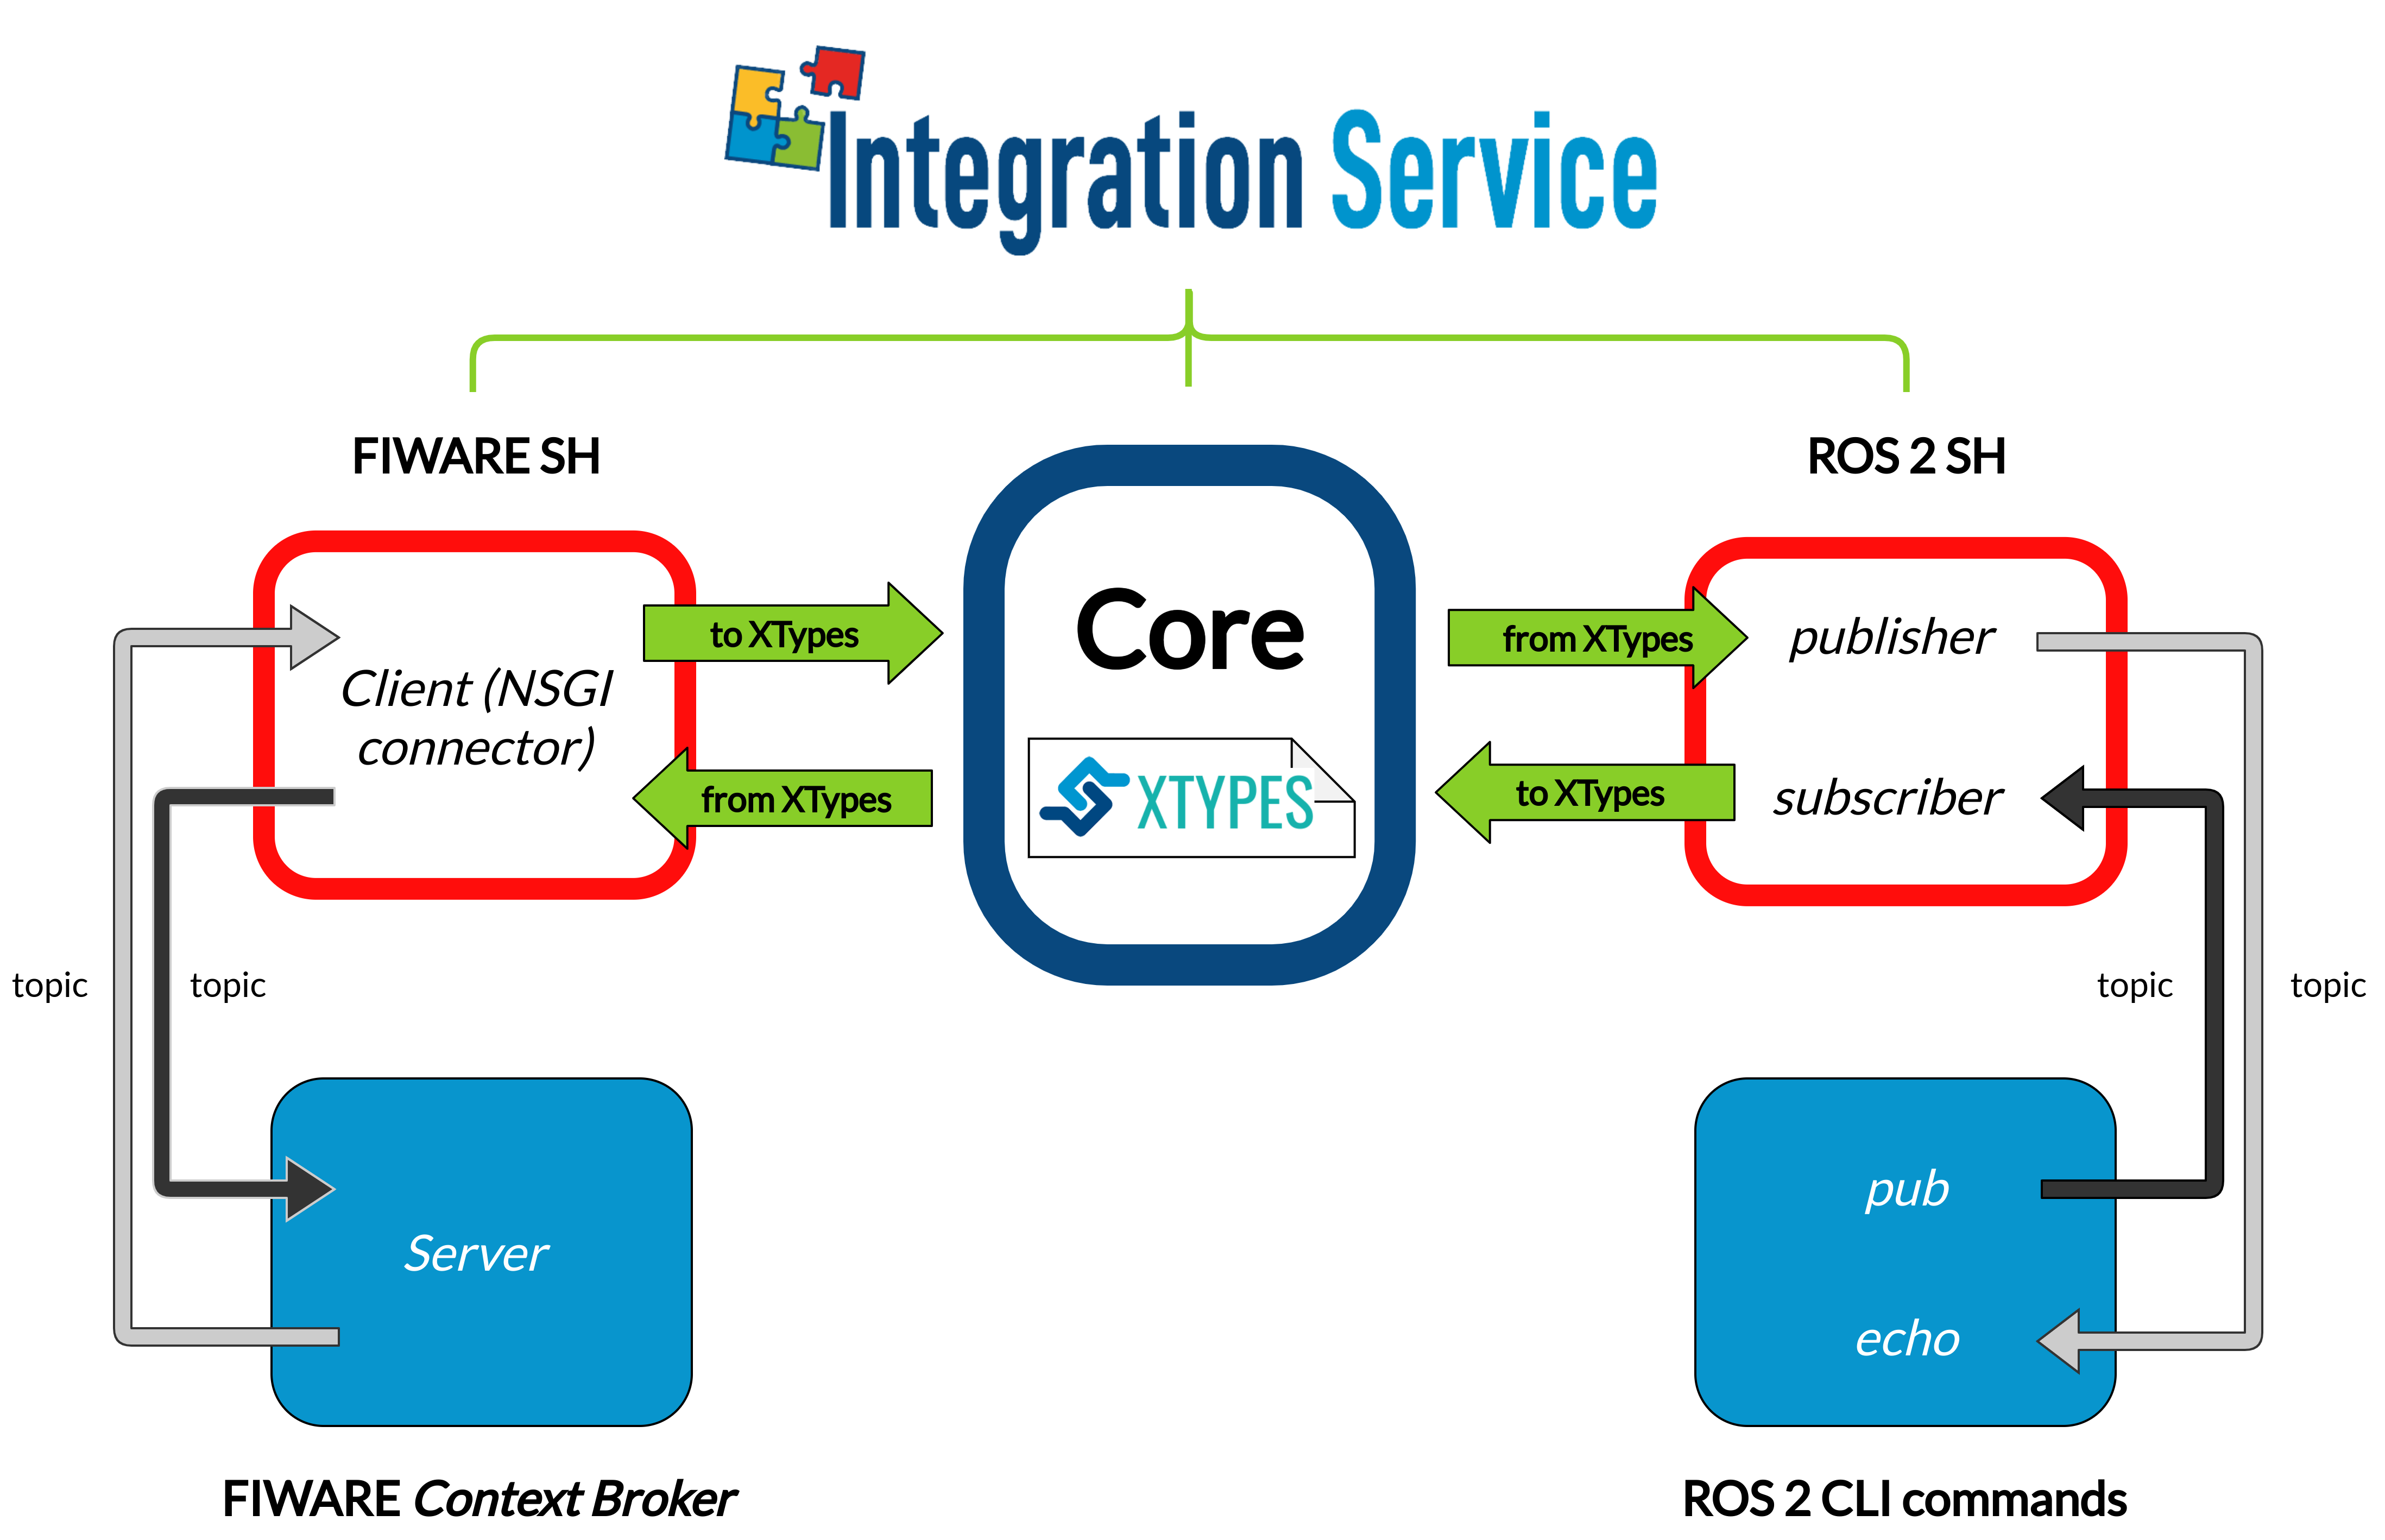
An interesting use case is the one of bringing information coming from the ROS 2 world into the FIWARE ecosystem, so that it can be used to translate information coming from physically operated ROS 2 robots into its FIWARE’s digital twin models.
The steps described below aim to provide an easy way to translate the information coming from a ROS 2 publisher into the FIWARE’s Orion Context Broker; and viceversa.
1.1.2.1. Requirements
To prepare the deployment and setup the environment, you need to have eProsima Integration Service correctly installed in your system. To do so, please follow the steps delineated in the Installation section.
Also, to get this example working, the following requirements must be met:
Having ROS 2 (Foxy or superior) installed, with the
talker-listenerexample working.Having the ROS 2 System Handle installed. You can download it from the ROS2-SH dedicated repository into the
is-workspacewhere you have eProsima Integration Service installed:cd ~/is-workspace git clone https://github.com/eProsima/ROS2-SH.git src/ROS2-SHHaving a FIWARE’s Context Broker correctly set up. To do so: * Set up a MongoDB database image:
docker run --rm --name mongodb -d mongo:3.4
Create a container for the FIWARE’s Orion Context Broker, linked to the previously created MongoDB docker:
docker run --rm -d --name orion1 --link mongodb:mongodb -p 1026:1026 fiware/orion -dbhost mongodb
It is very important to retrieve the
fiware/oriondocker container IP, because it will be later placed in the Integration Service YAML configuration file. To do so, simply check the output of the following command:ifconfig docker0 | grep “inet “Having the FIWARE System Handle installed. You can download it from the FIWARE-SH dedicated repository into the
is-workspacewhere you have eProsima Integration Service installed:cd ~/dds-is-workspace git clone https://github.com/eProsima/FIWARE-SH.git src/FIWARE-SH
After you have everything correctly installed, build the packages by running:
colcon build
1.1.2.2. Deployment
Below we explain how to deploy an example of this communication in both directions allowed.
ROS 2 pub to FIWARE
To enable communication from ROS 2 to FIWARE, open three terminals:
In the first terminal, go to the
is-workspacefolder, source the ROS 2 and local installations, and execute eProsima Integration Service with theintegration-servicecommand followed by the ros2_fiware__helloworld.yaml configuration file located in thesrc/Integration-Service/examples/basicfolder.Important
Please notice that the YAML may have a different IP address for the
hostfile that the one you retrieved from your docker container bridge, if so, replace it properly. From now on, in this example, the host will be located at IP address172.17.0.1:cd ~/is-workspace source /opt/ros/$ROS2_DISTRO/setup.bash source install/setup.bash integration-service src/Integration-Service/examples/basic/ros2_fiware__helloworld.yaml
In the second terminal, create the corresponding entities in the FIWARE’s Context Broker:
curl 172.17.0.1:1026/v2/entities -s -S -H 'Content-Type: application/json' -d @* <<EOF
{
"id": "hello_fiware",
"type": "HelloWorld",
"data": {
    "value": "",
    "type": "String"
}
}
EOF
Now, in your browser, go to http://172.17.0.1:1026/v2/entities. You should see the context broker entity named hello_fiware previously created.
In the third terminal, source the ROS 2 installation and launch the ROS 2
pub:source /opt/ros/$ROS2_DISTRO/setup.bash ros2 topic pub /hello_fiware std_msgs/msg/String “{data: Hello FIWARE}”
Now, if you press F5 in the browser, you should see that the entity has been correctly updated.
FIWARE to ROS 2 echo
To enable communication from FIWARE to ROS 2, open three terminals:
In the first terminal, go to the
is-workspacefolder, source the ROS 2 and local installations, and execute eProsima Integration Service with theintegration-servicecommand followed by the ros2_fiware__helloworld.yaml configuration file located in thesrc/Integration-Service/examples/basicfolder.Important
Please notice that the YAML may have a different IP address for the
hostfile that the one you retrieved from your docker container bridge, if so, replace it properly. From now on, in this example, the host will be located at IP address172.17.0.1:cd ~/is-workspace source /opt/ros/$ROS2_DISTRO/setup.bash source install/setup.bash integration-service src/Integration-Service/examples/basic/ros2_fiware__helloworld.yaml
In the second terminal, create the corresponding entities in the FIWARE’s Context Broker:
curl 172.17.0.1:1026/v2/entities -s -S -H 'Content-Type: application/json' -d @- <<EOF
{
"id": "hello_ros2",
"type": "HelloWorld",
"data": {
    "value": "",
    "type": "String"
}
}
EOF
Now, in your browser, go to http://172.17.0.1:1026/v2/entities. You should see the context broker entity named hello_fiware previously created.
In the third terminal, source the ROS 2 installation and launch the ROS 2
echo:source /opt/ros/$ROS2_DISTRO/setup.bash ros2 topic echo /hello_ros2
Again in the second terminal, update the FIWARE entity hosted in the Context Broker:
curl 172.17.0.1:1026/v2/entities/hello_ros2/attrs?type=HelloWorld -s -S -H 'Content-Type: application/json' -X PUT -d @- <<EOF
{
"data": {
    "value": "Hello, ROS2",
    "type": "String"
}
}
EOF
You should see the message echoed in the ROS 2 terminal.